
This kit was purchased 27.12.2014 from someone who originally bought it three years
ago on AliExpress. Its specifications are nearly identical to those
listed on drydockmodelsandparts.com, but there are some differences
in the layout of parts on the wooden sheets. Essentially, the first
half is entirely different, while the second half is identical. That
means all the parts are present and of the same quality, but their
placement on the wooden sheets varies. As for the rest, the metal parts
and overall contents are the same.

The contents include: individual bags with hull and slipway components, a box with metal parts, planks, cylindrical blanks, brass wire, and a packet containing the manual, stickers, and drawings. Everything is packed so tightly that once you take it out, you won’t be able to fit it back in! All the parts are accounted for and undamaged.

Now, let’s proceed step by step, starting with the drawings.

The drawings are at a 1:1 scale to the model, which is great. However,
there are two issues: 1.They were folded many times (I had to iron them
to make them usable). 2. Who thought of drawing blue lines on a light
blue background? It’s barely readable!
3. And the most important thing! Attention, this drawing is not 1:1, but 0.5% smaller than the original scale of the model! I will fix this.
To address this, I’ll scan and print them in black and white, supplementing them with anatomy plans. And I'll fix scale! I’ll dedicate a separate section to this topic.

The stickers, shown on the left in the photo, are straightforward. They’ll be used as guides for proper sanding of parts.
The manual is in Chinese! I had to translate the English version, which I had in PDF format, into a language I could understand. First, I converted it to Word, then used ChatGPT to translate each piece manually, as the automatic translation made no sense.
The manual is in Chinese! I had to translate the English version, which I had in PDF format, into a language I could understand. First, I converted it to Word, then used ChatGPT to translate each piece manually, as the automatic translation made no sense.


The only advantage of the Chinese manual is that it visually illustrates
the layout of parts on the sheets, which differs significantly from the
English version for the first half of the kit.

___________________________________________
Let's start with the details of the frame. All of them are placed on 4 large (M7, M8, M9, M10) and one small plate (the last one below in the photo, M11).

From all these parts a slipway is assembled, in which almost the entire hull of the ship is assembled.

_______________________________________
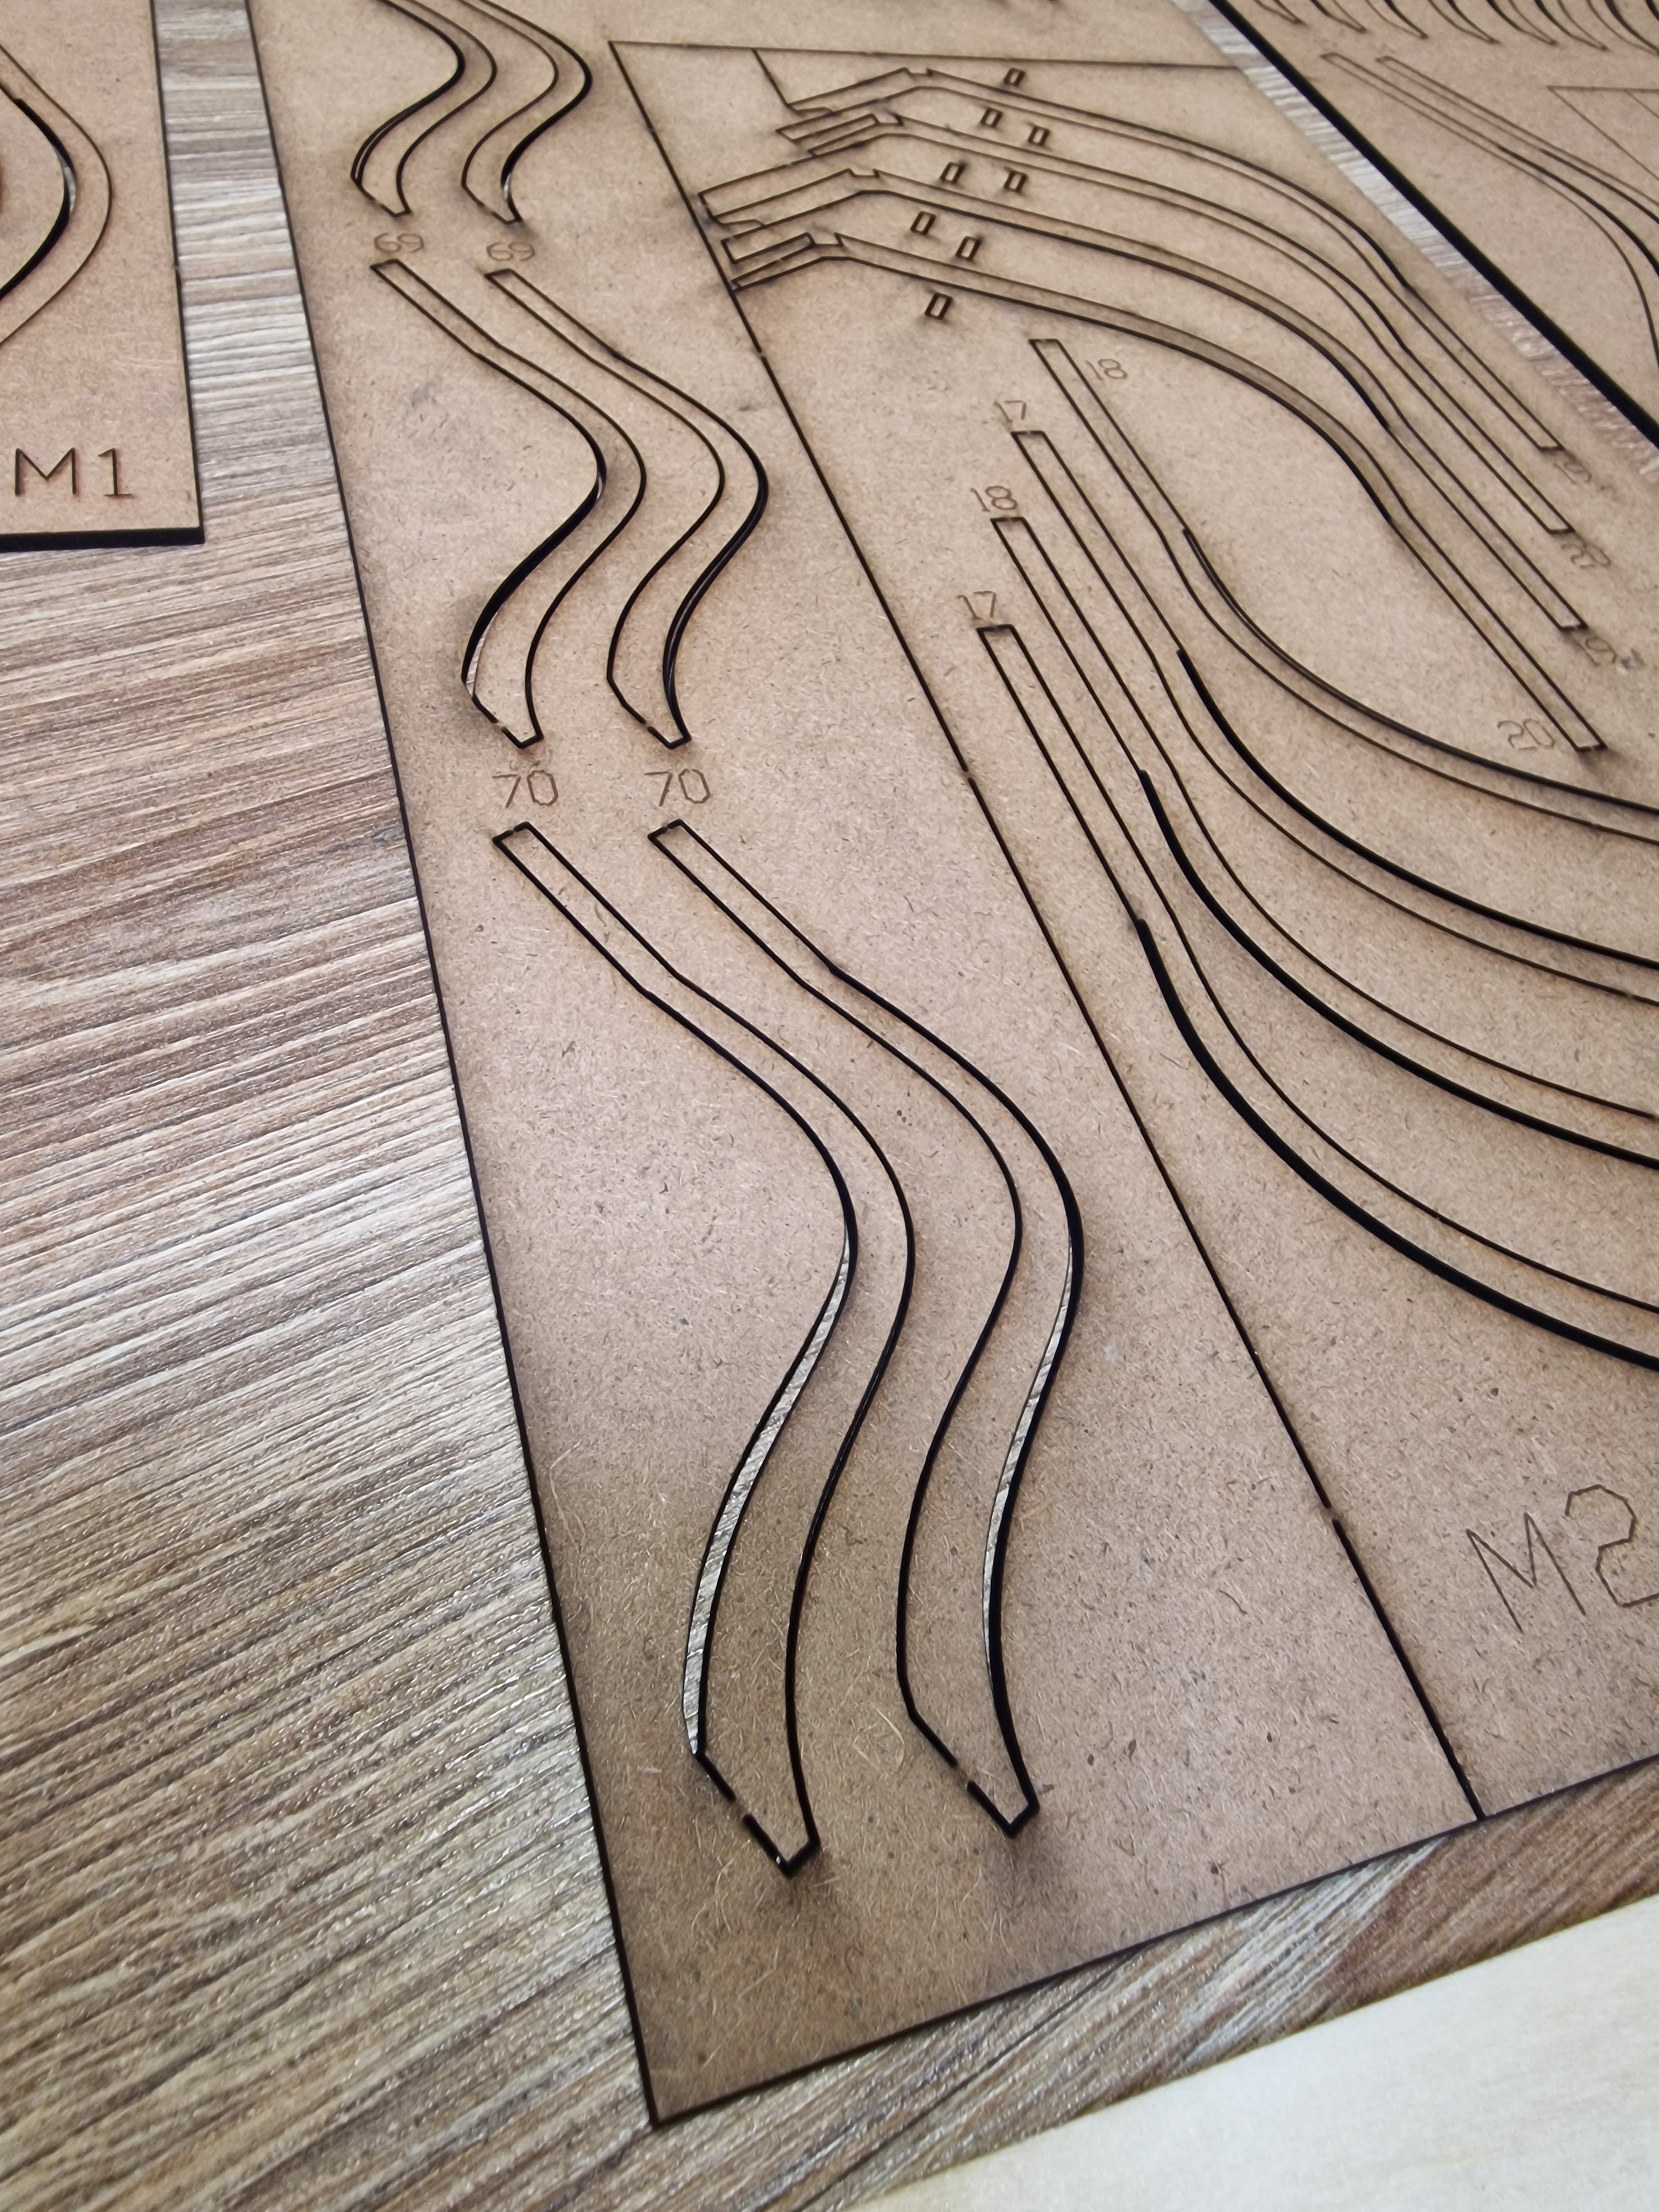
Next are the plates with conductors.
These plates, as details of the slipway, are not made of solid wood, but of pressed wood chips (fiberboard), but quite strong. Below in the photo is a plate (M11) from the slipway kit, M12 is a conductor for assembling the keel and the rest are conductors for assembling the frames.

In general, nothing complicated. M12 is a veneer in which the contours
of the keel parts are cut out. By the way, in the first sets this jig
was not made of veneer.


With plates M1, M2, M3, the situation is similar. They are needed for the correct assembly of frames and giving them the correct profile.

__________________________________________
Some still have fragments of the slipway.

On others there are retaining clamps.

On others there are retaining clamps.

And on the M13 plate there are conductors, along which the frames are
cut and the line of the barhouts, etc. is drawn. It, like the M12, is
made of veneer.


I briefly ran through the wooden parts that will not be on the ship, but without which it is impossible to assemble it... And below I will tell you in more detail about those that the model will consist of. This is what "The Ship. The Beginning" looks like )))

____________________________________________
№1, №2, №3, №4.

The wood is good, dry, smooth and without knots (in places of parts). Milling without visible defects and marriage (this will concern all blanks.) But I want to note that there were such moments.

The second point is dust and sawdust from the cutter. Probably, depending on the density of the wood and the sharpness of the cutter, the sawdust was held differently in different parts. From some plates it was possible to extract sawdust with a vacuum cleaner, and from others it was difficult even to scrape it with a metal needle. (I will tell you more about this later).


__________________________________________
№5, №6, №7, №8.

Continuing with the topic of sawdust after the milling cutter, after removing it, the cut ends are visible differently on different workpieces. On some, they are smooth, like after a knife, while on others they have villi, which will require additional grinding to get rid of this "wool".

Replaced parts are still found instead of defective ones.

And one more inevitable moment is the difference in wood color.

And I'm not talking about the halftones of brown. This is where the
details differ and create the effect of the multi-component nature of
the entire ship model. I'm talking about the specific white areas of
wood that will stand out significantly from the rest. But I have an idea
for this, to use water-alcohol wood stain to tint these very light
areas. I'll experiment on samples and I think I'll get a good result.
___________________________________________
№9, №10, №11, №12, №13.

All the plates have the same parameters, up to 4m thick, but the 12th is
short and there was another one with semicircular parts, which turned
out to be defective on the 13th plate.

It's nice that this defect was replaced and a new set was given, as well as the part in the photo below.

And we are smoothly approaching the most important difference between
the kit from AliExpress and the drydockmodelsandparts website. This is
the method of milling the blanks! The first 12 plates differ not only in
the different positioning of the parts, but also in the cutting method.
The 13th part is milled along the entire perimeter, but the last 0.5 mm
is not cut to hold it in place. This is how all the parts from
drydockmodelsandparts are made. And in the kit from AliExpress, only
parts from the 13th are made this way, and from the 1st to the 12th, the
cutting method is as shown in the photo below, on the right.
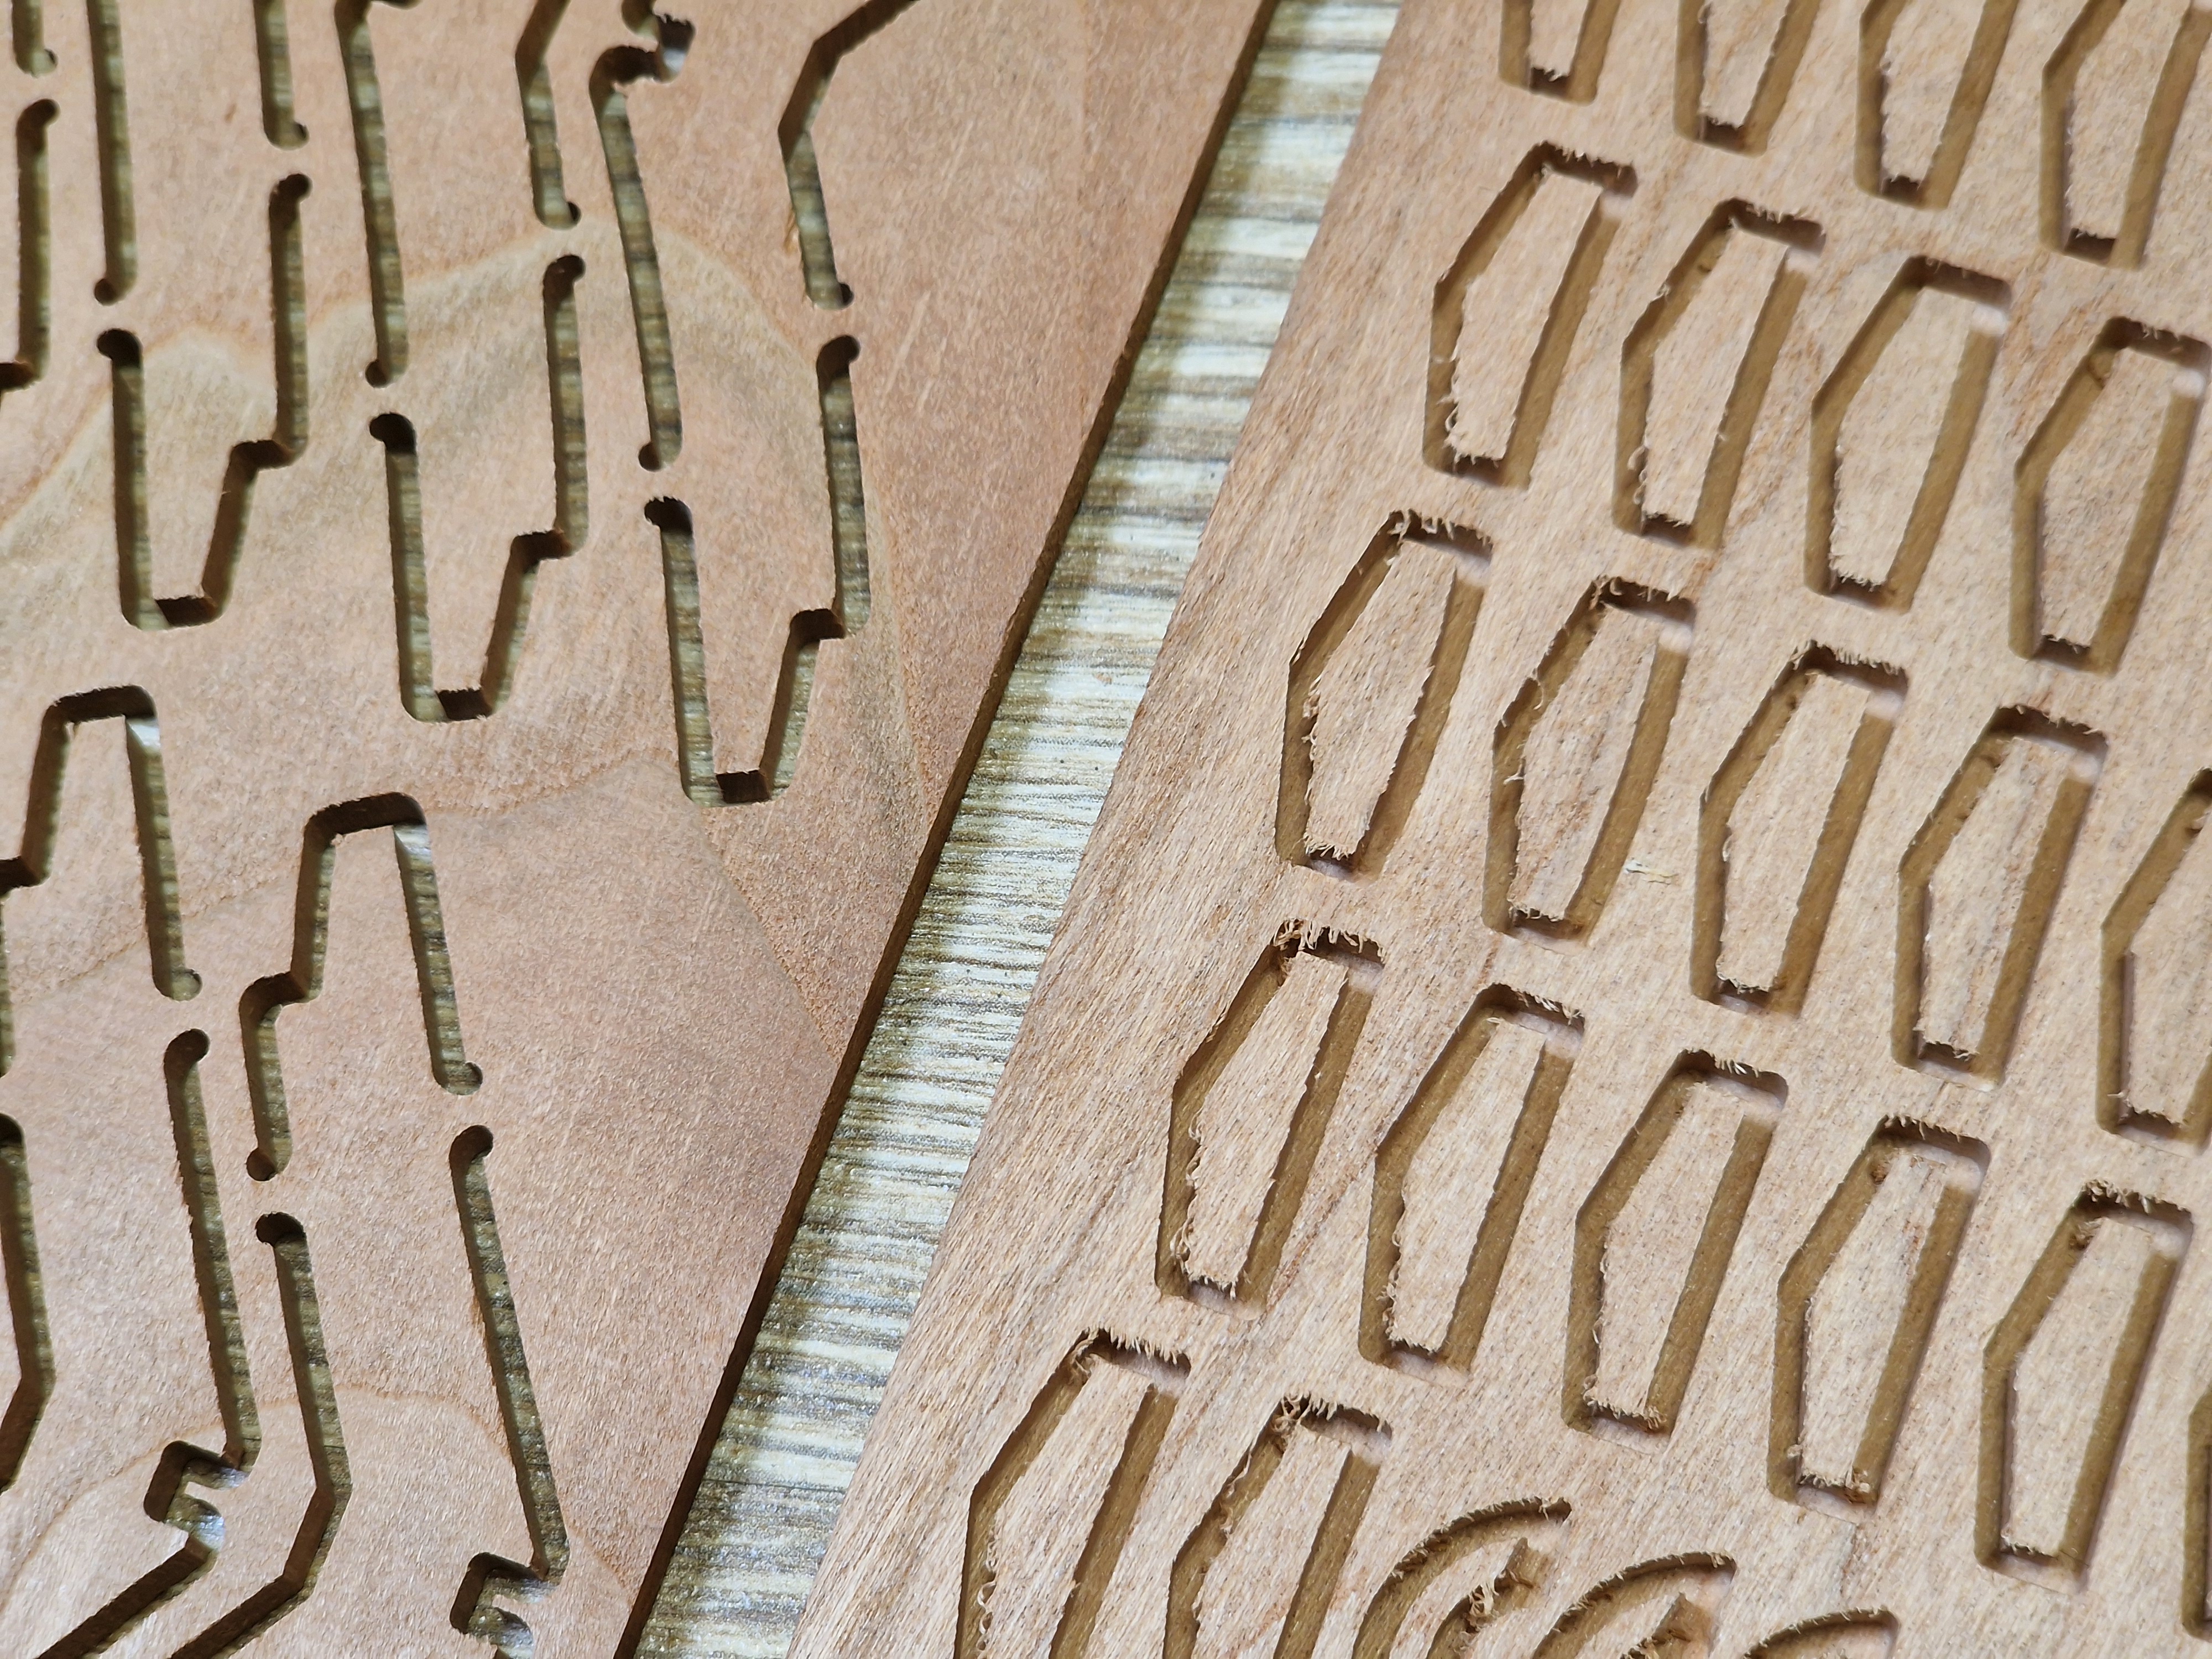
That is, the part on the plate is cut through, and several holders are
left that hold the part. Which, by the way, simplifies in most cases the
removal of sawdust. And also, the plate with #14 is not in the set, as
well as in the instructions, as well as in other sets. It simply does
not exist. Well, okay, 13th, here at least it would be logical, but
14... but as it is)))
_____________________________________________
№15, №16, №17, №18.

Firstly, they have a different thickness. No. 15 - 4.3 mm; No. 16 - 5.2 mm; No. 17 - 5.1 mm; No. 18 - 5.2 mm.
Secondly, all these plates are double-sided, i.e. milling occurs on both sides.

In the 16th and 18th, grooves are cut for horseshoe-shaped hinges on both sides.


And the only thing that upset me a little is the plate with the keel parts.

It's hard to explain, but the angle at which the plates are cut does not
show the structure of the wood very nicely. The fibers do not go
lengthwise, but rather diagonally, creating a pattern... I also call it a
"fish eye". I will still check how it will look under oil and bitumen,
and in theory under a little stain, but it is what it is. Another point
is that if I make a second case, as planned, these parts will be tedious
to make again. Therefore, I will return to this issue.
_____________________________________________
№19, №20, №21, №22.

Firstly, they have different thicknesses. No. 19 - 3.4 mm; No. 20 - 2 mm; No. 21 - 3 mm; No. 22 - 2 mm.
Secondly, they also differ in the milling method.

They have all the same defective parts replaced.
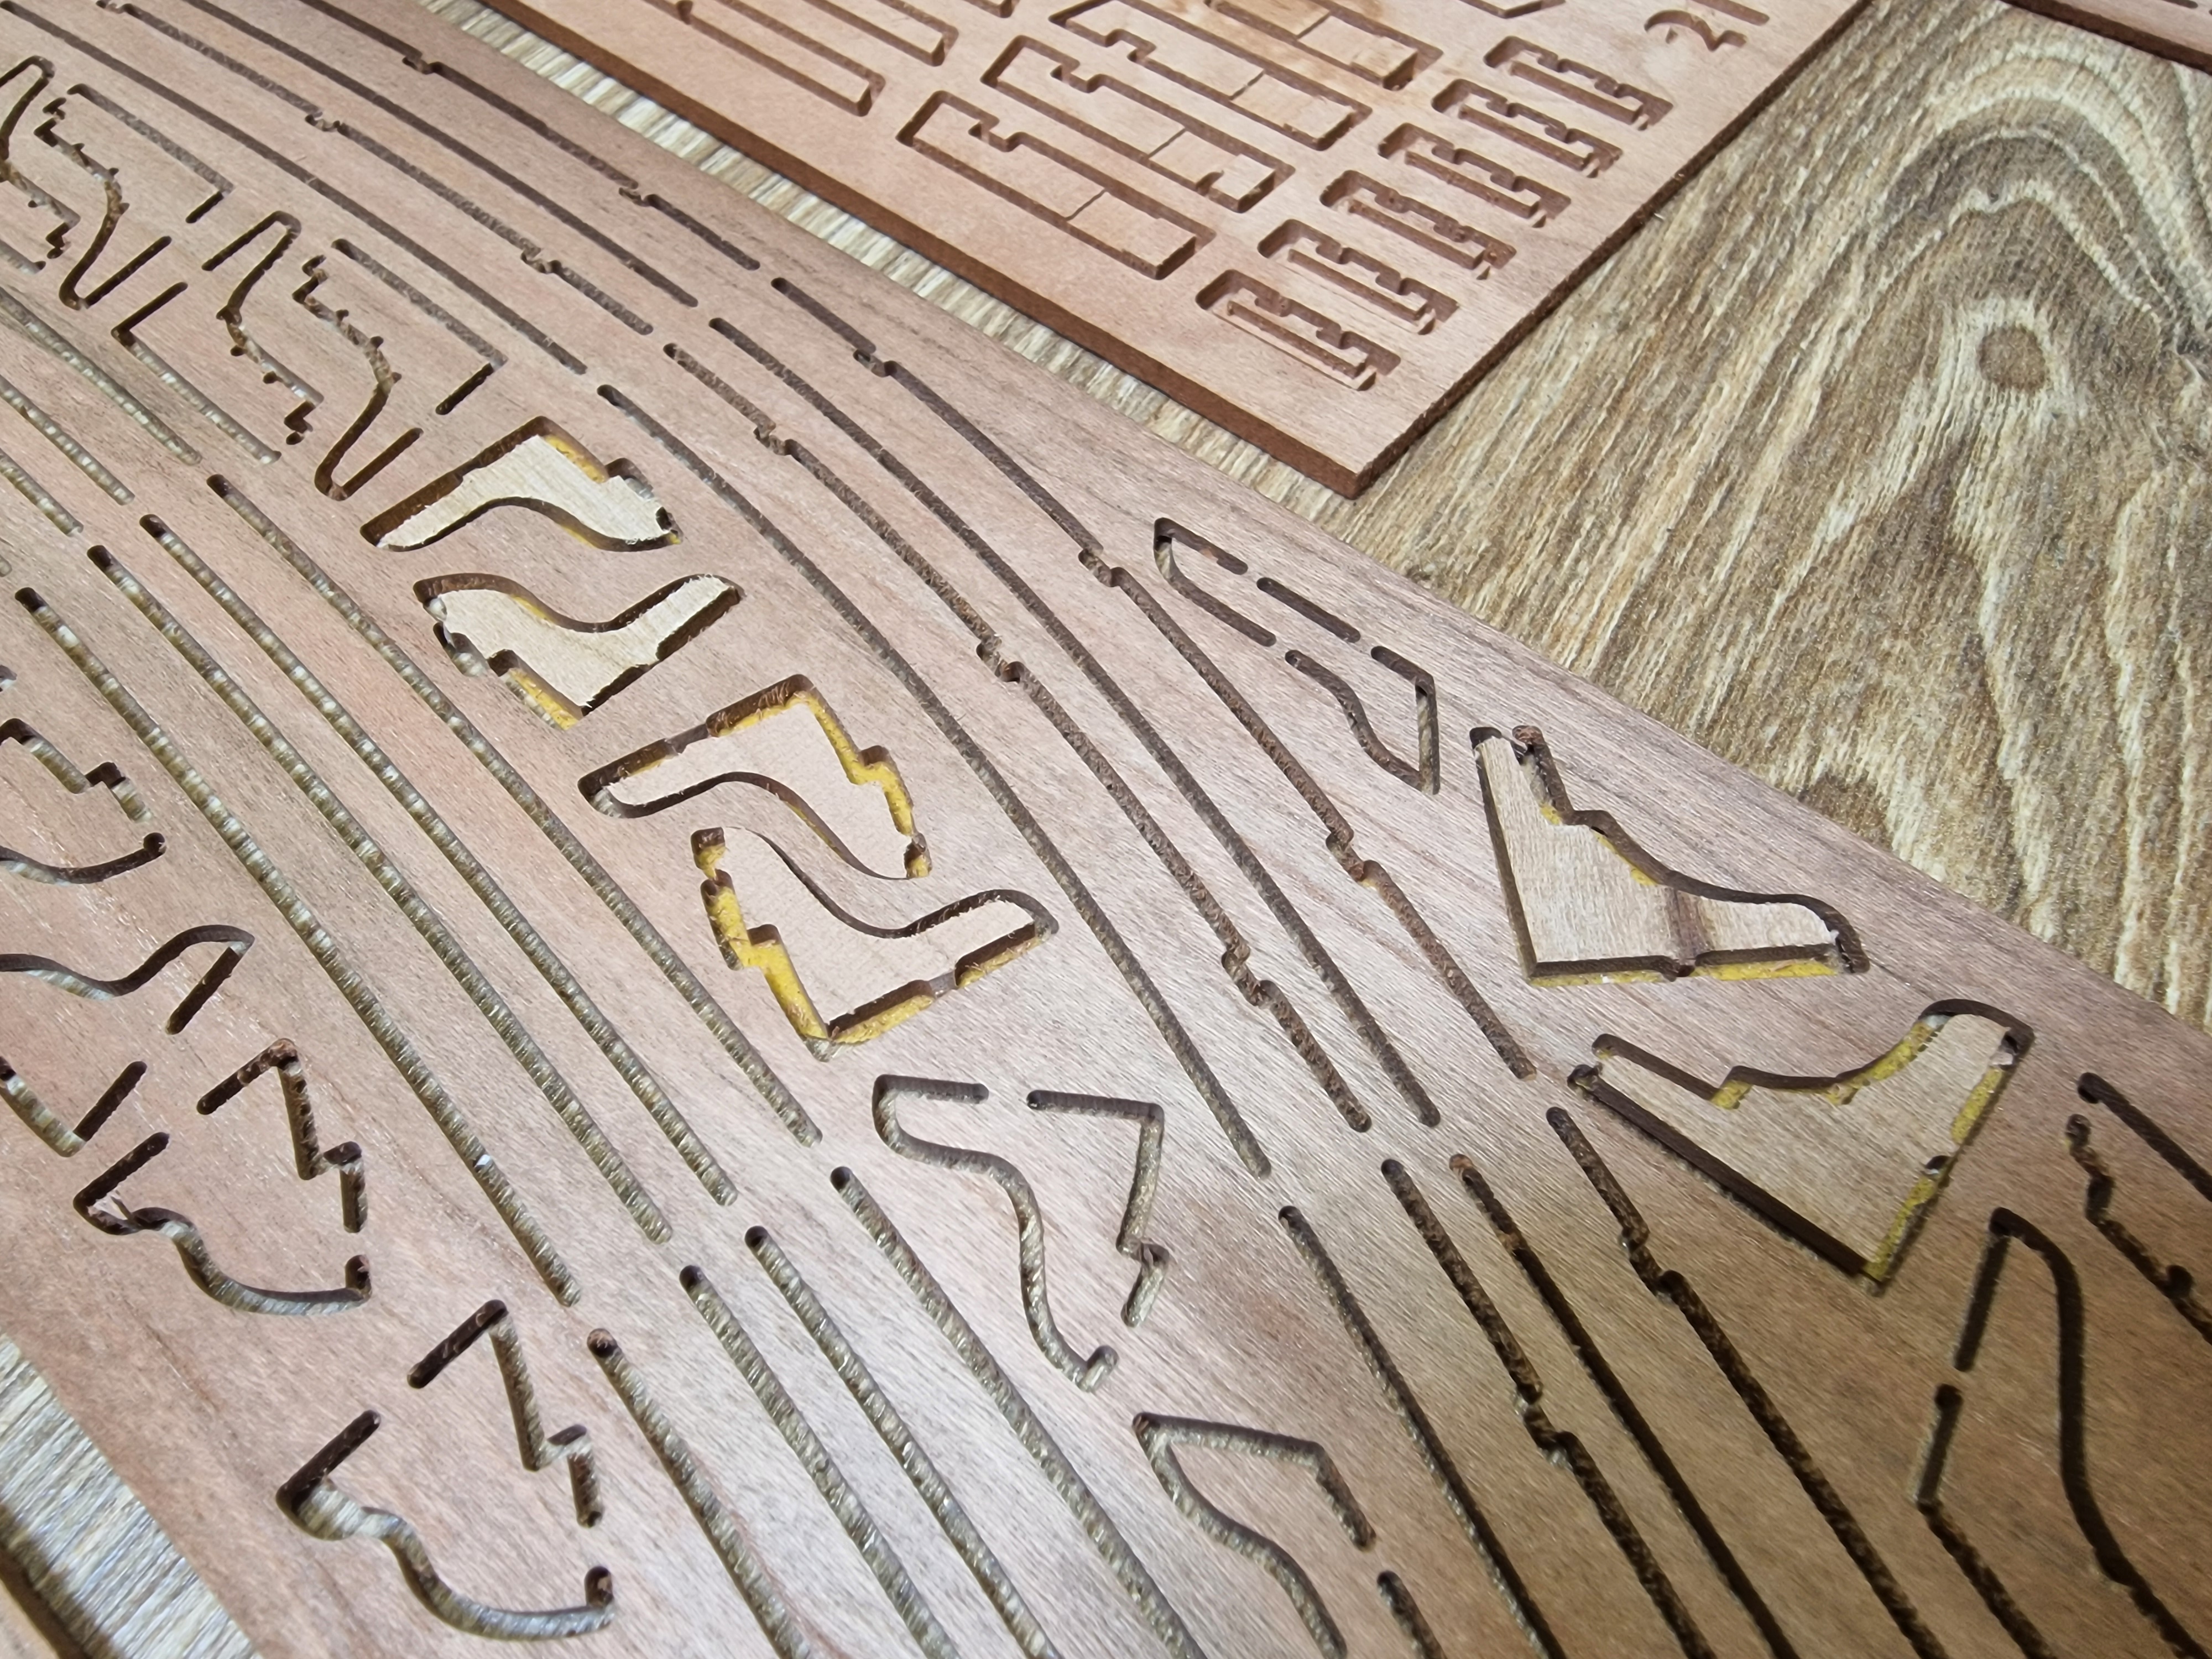
Still, some have light areas and on plate 22 there are a number of parts
with a cut not only through, but also to a certain level. And as you
can see in the photo, there are a lot of chipped thin areas. And now, it
is difficult to judge, but I am afraid that this will affect the
accuracy of the fit of the parts and the appearance of cracks, but I may
be wrong, practice will show.


But it is also located inside and will be covered on all sides, so for now everything is fine.
___________________________________________
№23, №24, №25, №26, №27, №28.

The 23rd, 24th and 26th milled parts.


The combs on the grates are even and without visible damage.


__________________________________________
№29, №30, №31, №32, №33, (№34), №35.

29 - 2.4 mm; 30 - 2.1 mm; 31 - 2 mm; 32 - 2.5 mm; 33 - 1.2 mm; 34 - 2.3 mm; 35 - 2 mm; 436 - 2 mm; 37 - 4.3 mm; 48 - 2.6 mm.
Here, I will not repeat myself, everything is the same: something is milled, something is cut on a laser. But everything is still in good quality.


Details that I have signed myself for convenience.


There were also several more wooden parts in the general kit.

These are deck slats, cylindrical blanks for the mast and slipway, a bowsprit blank and several rods of brass wire..

That's all for the wooden materials.
As for the metal parts, they are completely the same as in all the kits. I didn't unpack them, but after visually comparing them, I didn't find any differences. During the assembly process, I will take detailed photographs of them before and after processing and blackening.


Anchor parts and the anchors themselves; cannon parts and the cannons themselves, large and small; parts for the rudder, pumps, fences, pulleys, spars, and stove.
Also in the odds and ends box were: anchor rope (junk), rims (too bad they were bent and not cast), rings and dowel pins (too thick for my liking), and a few more pieces of wood, which I already showed you earlier.
I'll go into more detail later, but in short, the set is very "rich" and everything looks great (not toy-like, like most mass-market kits), and that's really cool. So I RECOMMEND it. It's especially good to buy from AliExpress, where it's significantly cheaper than other sites.
And below is the arrangement of the parts on the AliExpress plates, because they differ from the options from other sites.


Next...